DIY Milk & Cookies Halloween Costume
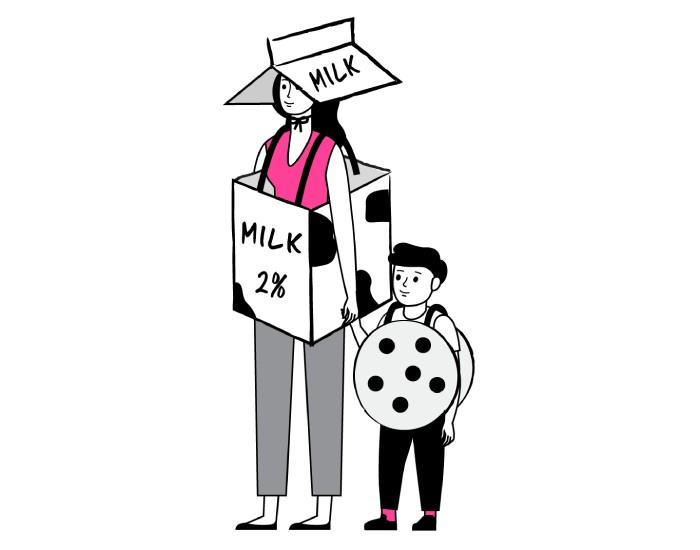
Your moving boxes could be the beginning of Halloween costumes. With a little paint and creativity, your moving boxes can become the perfect Halloween duo – milk and cookies! It’s an easy DIY project that’s just as fun to make as it is to wear.
Whether you’re crafting with kids, roommates, or your partner, this project proves that a few leftover boxes can turn into something adorable, clever, and budget friendly. And the best part? You’ll use materials you probably already have at home.
Article Summary
- Turn leftover moving boxes into a Halloween hit. This DIY milk & cookies costume guide shows how to reuse simple cardboard boxes from your last move and transform them into a sweet, crowd-pleasing costume, perfect for couples, friends, or families.
- Gather everyday supplies you probably already own. With just scissors, ribbon, glue, paint, and felt, you can craft two matching costumes - one milk carton and one giant cookie - without spending more than a few dollars.
- Keep it creative and sustainable. Instead of tossing used boxes, give them a second life. This eco-friendly project encourages reusing materials while keeping your Halloween budget low and your imagination high.
- Follow a clear, step-by-step guide. Each stage is broken down with simple instructions, from cutting and gluing to painting and decorating. Whether you're making the costume for kids or adults, you'll find helpful pro tips for a comfortable fit and personal flair.
- No crafting experience required. This beginner-friendly project is designed for anyone who wants a fun, affordable costume idea - no sewing, no fancy tools, just a little creativity and the spirit of Halloween.
- Strong moving boxes can stay useful long after moving day. With Piece of Cake Moving & Storage, sturdy boxes and packing supplies help protect your belongings during a move, then can be reused for storage, organization, or creative DIY projects like this one.
What you'll need:
Tools:
- Scissors
- Hot glue gun
- Paintbrush
Materials:
- 2 large cardboard moving boxes
- Hot glue sticks
- Black and tan paint
- Dark brown felt
- Ribbon
- White spray paint
How to Make the Milk Costume
Step 1: Create the carton base
To make the body of the milk carton, take one of the large cardboard moving boxes and cut off the flaps on the top and bottom with scissors.
Step 2: Build the carton top
To create the top of the milk carton, cut off two corners of one of the flaps you removed from the larger box (creating a right angle for each).
Using another two of the flaps cut off from the larger box, put hot glue along the long edges of the two flaps and create a right angle (like an A-frame tent).
On the inside of the angle, use hot glue to attach the two corners you cut off beforehand to stabilize the angle.
Take the final flap you cut off the larger box and cut it in half lengthwise. Use hot glue to attach one of the halves to the top of the angle you created to finish constructing the top of the milk carton.
Step 3: Paint it white
Use the white spray paint to fully cover the body of the milk carton. Once the glue has dried on the top of the milk carton, fully cover it in white spray paint, too. Let the paint dry.
Step 4: Add the details
Use the black paint to paint the details of the milk carton and let it dry.
Step 5: Add straps
Cut 2 pieces of ribbon and use the hot glue to attach them to the top of the milk carton as a tie to secure it to the wearer's head.
Have the wearer step into the body of the milk carton to estimate the length of ribbon needed to suspend it from their shoulders. Cut the ribbon and attach it to the front and back of the body of the milk carton to create straps. Let the glue dry.
How to Make the Cookie Costume
Step 1: Cut out the cookie shape
To create the chocolate chip cookie costume, use the other large cardboard moving box and cut out 2 large circles.
Step 2: Paint it tan
Paint one side of each of the cardboard circles with the tan paint. Let the paint dry.
Step 3: Add chocolate chips
Use scissors to cut out chocolate chip shapes from the brown felt. Use hot glue to attach the chocolate chip shapes to the painted sides of both cardboard circles. Let the glue dry.
Step 4: Add straps
Cut lengths of ribbon long enough to suspend the cardboard circles on the front and back of the person who will be wearing the costume. Attach each ribbon to the unpainted sides of the circles with hot glue to create straps.
Now you're ready to step out together to celebrate the spooky (but sweet) holiday in style!
From Moving Day to DIY Day
Before you recycle your next set of moving boxes, consider giving them a second life. With a little creativity, leftover cardboard can become part of a family tradition, a Halloween costume, or an afternoon craft project that turns moving supplies into something memorable.
And when it's time for your next move, Piece of Cake Moving & Storage supports the entire process, from packing supplies and sturdy moving boxes to transport, storage, and full service local and long distance moving. With easy online booking, Flat Fee pricing, and 24/7 all year round availability, you'll have the supplies and support to make moving day easier, and maybe even leave you with a few boxes worth repurposing afterward.